Angular 19 introduced a powerful new hook called afterRenderEffect, combining the capabilities of effect and afterRender into a single, efficient function. This makes it easier to manage side effects that depend on signal changes and the completion of Angular’s rendering cycle. Before diving into afterRenderEffect, let’s briefly recap the core concepts of effect and afterRender individually.
The afterRenderEffect hook was introduced in Angular 19 and combines the effect and the afterRender hook.
effect(() => console.log(this.signalSource()))In this snippet, the console.log will run every time signalSource is marked as dirty.
The afterRender hook, on the other hand, triggers its callback function after Angular has finished rendering the view and during every change detection cycle. This is crucial for tasks that require the DOM to be fully updated.
afterRenderEffect merges these two functionalities. The callback will execute when either a dependent signal marked as dirty or the rendering cycle completes. This combination allows us to apply performance optimizations and preventing layout thrashing.
In this article, we’ll explore how afterRenderEffect works, demonstrate its practical applications, and show you how it can improve the performance when we should deal with the DOM in our Angular applications.
The syntax
The afterRenderEffect function accepts a callback, which is invoked when Angular finishes rendering.
constructor() {
    afterRenderEffect(() => {
      console.log(
        'afterRenderEffect => logs when the application finishes rendering',
      );
    });
  }
If the callback depends on a signal, it will also execute whenever that signal’s value changes.
afterRenderEffect is particularly useful for DOM manipulation, and it provides distinct phases to optimize performance and prevent layout thrashing.
The phases and the execution order are the following:
- earlyRead
-
-
- Used to read DOM properties before any subsequent write operations.
-
- write
-
-
- Used to modify DOM properties.
-
- mixedReadWrite
-
-
- Used for operations that require both reading and writing to the DOM, when separation into distinct phases is not feasible.
-
- read
-
- Used to read DOM properties after write operations.
-
 afterRenderEffect({
      earlyRead: () => {
        return 'value - 1';
      },
      write: (value) => {
        console.log(value()); // logs value - 1

        return 'value - 2';
      },
      mixedReadWrite: (value) => {
        console.log(value()); // logs value - 2

        return 'value - 3';
      },
      read: (value) => {
        console.log(value()); // logs value - 3
      },
    });
Each phase, except earlyRead, receives the value returned by the preceding phase as its argument. The output of each phase then becomes the input for the next. If the earlyRead returns ‘value -1’, the argument of the write phase will be ‘value-1’.
It’s important to understand that the signal argument acts as a dependency. Similar to how the signals work, if the signal value is equal to the value of the previous execution, then that phase won’t run. This prevents unnecessary DOM operations and optimizes performance
Let’s see this example to understand how the execution flows:
signalSource = signal<string>('initial value');

afterRenderEffect({
   earlyRead: () => {
     const value = this.signalSource();
     console.log(`earlyRead => ${value}`);

     return value;
   },
   write: (value) => {
     console.log(`write => ${value()}`);

     if (value() === 'updated_value_2') {
       return 'updated_value_';
     }
     return value();
   },
   mixedReadWrite: (value) => {
     console.log(`mixedReadWrite => ${value()}`);
     return value();
   },
   read: (value) => {
     console.log(`read => ${value()}`);
   },
 });

 setTimeout(() => {
   this.signalSource.set('updated_value_');
 }, 1000);

 setTimeout(() => {
   this.signalSource.set('updated_value_2');
 }, 2000);

 setTimeout(() => {
   this.signalSource.set('updated_value_3');
 }, 3000);
Let’s see what this code outputs to the console.
Since the afterRenderEffect will run when the application finishes rendering, the first run will go trough each phase sequentially with the initial value.
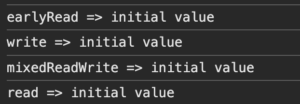
The second run will go through each phase since the value on every phase is not equal to the previous execution (“initial value” != “update_value_” )
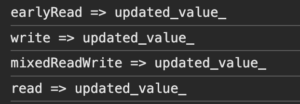
The third run will go only on the earlyRead and write. If you notice the code, in the write phase we return the value “updated_value_” if the incoming signal value equals to “updated_value_2”.
So, the mixedReadWrite wont run since the previous signal value equals to the current signal value (“updated_value_” === “updated_value_”)

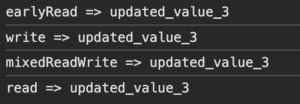
The fourth run will go through each phase since the value on every phase is not equal to the previous execution.
Additionally, we can define a cleanup function that will be executed when any dependent signal changes.
afterRenderEffect({
   earlyRead: (onCleanup) => {
     onCleanup(() => {
       console.log('earlyRead => callback');
     });

     // Code removed for brevity
   },
   write: (value, onCleanup) => {
     onCleanup(() => {
       console.log('write => callback');
     });

     // Code removed for brevity
   },
   mixedReadWrite: (value, onCleanup) => {
     onCleanup(() => {
       console.log('mixedReadWrite => callback');
     });

     // Code removed for brevity
   },
   read: (value, onCleanup) => {
     onCleanup(() => {
       console.log('read => callback');
     });
     // Code removed for brevity
   },
 });
To illustrate the practical application of this hook, let’s explore several use cases.
Use case – scroll on an element
Consider a scenario where we have a list of products. Upon clicking a button, a details section for the selected product is displayed below the list. Once the details section is rendered, we want to automatically scroll to it.
The UI looks like this:

This implementation requires two distinct phases: first, reading the element’s offset, and second, applying the scroll (writing).
readonly hiddenSection = viewChild('hiddenSection', { read: ElementRef });

 constructor() {
   afterRenderEffect({
     earlyRead: () => {
       return this.hiddenSection()?.nativeElement.offsetTop || 0;
     },
     write: (scrollingPosition) => {
       window.scrollBy({ behavior: 'smooth', top: scrollingPosition() });
     },
   });
 }
Note that we are using two distinct phases, and the value returned by earlyRead is passed as an argument to the write phase.
Now, you might be thinking, 'Hey, couldn’t we just use a regular effect or afterRenderEffect without all those separate phases?’. And you’d be right! For this simple example, it’s definitely possible. But honestly, it’s a bit too straightforward to really show off the performance boost you get from using those explicit phases.
To truly understand the value of these phases, let’s explore a layout thrashing scenario. This will illustrate why separating read and write operations is so important.
Use case – layout trashing
We’ll create a simple UI featuring three boxes, and dynamically update their widths with random values.
component.html
<div #container>
  <div #box class="box"></div>
  <div #box class="box"></div>
  <div #box class="box"></div>
</div>
component.ts
boxes = viewChildren('box', { read: ElementRef });

for (let i = 0; i < 100; i++) {
   this.boxes()!.forEach((box) => {
     box.nativeElement.style.width = Math.random() * 200 + 'px';
   });
 }
Each box receives a randomly generated width, and this process is executed 100 times to highlight the performance effects.
This is what the UI looks like:

Now that we’ve applied these changes, let’s analyze the resulting performance using the browser’s developer tools.

While we’re dynamically changing element widths, the browser’s optimization kicks in. It applies all the width changes and triggers a single reflow after all write operations are complete, rather than reflowing after each individual change.
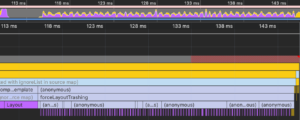
What will happen if we write to the DOM (change the width) and immediately attempt to read that width? Well, this will force the browser to run a reflow.
Write-Read
Reflows can slow things down, so browsers try to be efficient by batching up those width changes. But here’s the thing: if you change a width and then immediately ask the browser, “Hey, what’s that width now?” the browser is like, “Oops, I haven’t updated the layout yet! Let me do that now for you” So, it has to do a quick recalculation of the page’s geometry.
  for (let i = 0; i < 100; i++) {
      this.boxes()!.forEach((box) => {
        // Change a style that affects layout:
        box.nativeElement.style.width = Math.random() * 200 + 'px';
        // Immediately read a style that depends on layout:
        const width = box.nativeElement.offsetWidth; // This forces layout!
        console.log(width);
      });
    }
This is what the performance analyzer looks like:
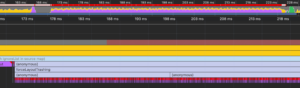
The graph, filled with red triangles and purple reflow areas, clearly indicates significant performance issues. To improve this, we must separate our DOM operations into distinct write and read phases.
Batch write and read
To fix the layout trashing we should separate the writes from the reads.
 for (let i = 0; i < 100; i++) {
    this.boxes()!.forEach((box) => {
      box.nativeElement.style.width = Math.random() * 200 + 'px';
    });

    this.boxes()!.forEach((box) => {
      const width = box.nativeElement.offsetWidth;
      console.log(width);
    });
  }
The performance here seems better but not yet ideal.
Finally use the afterRenderEffect hook
afterRenderEffect({
      write: () => {
        for (let i = 0; i < 100; i++) {
          this.boxes().forEach((box) => {
            box.nativeElement.style.width = Math.random() * 200 + 'px';
          });
        }
      },
      read: () => {
        for (let i = 0; i < 100; i++) {
          this.boxes()!.forEach((box) => {
            const width = box.nativeElement.offsetWidth; // This forces layout!
            console.log(width);
          });
        }
      },
    });
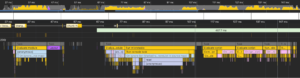
This is what the performance analyzer looks like:
In conclusion, afterRenderEffect provides optimal performance by allowing the browser to complete each phase before proceeding to the next.
Thank you for reading. I hope this article has provided a clear understanding of afterRenderEffect and its performance benefits.